Chapters
Getting started with Castiel
Castiel is one calculator that wears six faces. Underneath, a single computation engine and a single editable paper-tape run everything; on the surface you pick the mode that fits the job. Add up a shopping list in Simple, work a trigonometry exercise in School, run a numerical method in Engineer, price a loan in Financial, or author a small program in Programming and Programming+. Nothing is walled off between modes: the same engine, the same tape, and the same results carry across all of them. A mode is just a different keypad and workspace over the shared machinery.
The name fuses three legendary calculator makers - CAsio, TI (Texas Instruments), and ELektronika. Castiel is paid once, with a maximum price of 2 (USD or EUR). There is no subscription, there are no ads, and there is no account to create. Your work stays on your own machine. This chapter orients you: what you see when the app opens, how to move between modes, and the short setup window that greets you the first time you run it.
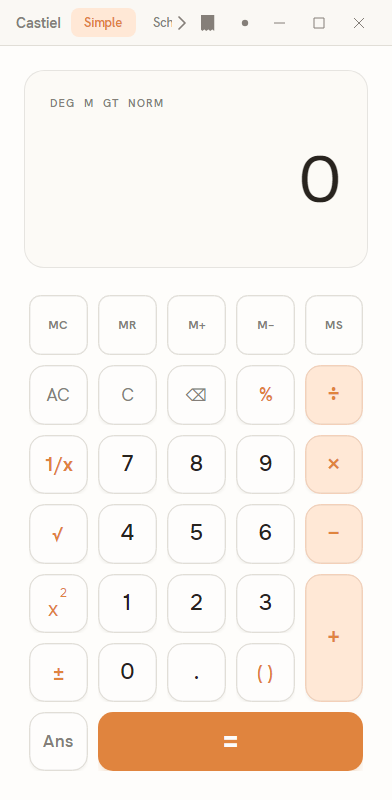
The app window at a glance
The window has three regions, from top to bottom and side to side.
The title bar and mode strip. Along the very top sits the Castiel wordmark, then the mode tab strip - one pill per mode. The active mode's pill is highlighted; in the screenshot above, Simple is selected. Reading the strip left to right the pills are:
| Pill | Mode | What it is for |
|---|---|---|
Simple |
Simple | Everyday arithmetic: a clean four-function keypad with memory keys. |
School |
School | The scientific workspace - Natural Textbook entry, plus graphing, statistics, equations, and more. |
Engineer |
Engineer | School plus a computer-algebra system, numerical methods, units, and constants. |
Financial |
Financial | Time value of money, cash flows, amortization, and the rest of a financial calculator. |
Programming |
Programming | Author calculator programs as blocks or as a listing. |
PRG+ |
Programming+ | Programming with an added panel that talks to your own configured AI provider. |
The last pill reads PRG+ on screen - a compact label for Programming+; a screen reader announces it as "Programming plus". If the window is too narrow to show every pill, a ‹ and a › chevron appear at the ends of the strip; clicking them scrolls the pills one whole tab at a time so a tab is never left half-hidden. To the right of the strip sit the tape control and the standard window buttons (minimize, maximize, close).
You will not necessarily see all six pills. You choose which modes appear in the strip during first-run setup (below), and you can change that selection at any time in Settings. Hiding a mode only removes its pill; it does not delete anything.
The main area. The centre of the window is the mode's workspace. In Simple mode (shown above) this is a display at the top - a status line of annunciators such as DEG M GT NORM, with the running result shown large beneath it - over a keypad of number, operator, and memory keys. Each mode fills this area with its own display and keypad; School adds an apps rail and a working panel, Financial lays out its money keys, and so on. Those layouts are covered in each mode's own chapter.
The paper tape. Every mode shares one paper-tape: a running, editable log of the calculations you commit. It is not a throwaway history - you can scroll back through it, correct an earlier step, and watch the results that depended on it update. The tape is reached from the tape control in the title bar, and in some modes (such as School) it is shown alongside the keypad as a working panel. Because it is shared, a value you compute in one mode is available to the tape you see in another. The tape has its own chapter: the paper tape.
Switching modes
Click a pill in the mode strip to switch to that mode. The main area changes to that mode's workspace; the shared tape stays put. Switching is instant and loses nothing - your tape and your settings are unaffected.
Simple and School are free to use without limit. The advanced modes - Engineer, Financial, Programming, and Programming+ - run free for 30 minutes per session, after which they step back to a basic mode until you next launch, unless you have purchased Castiel. The tape and the connectors stay free throughout. See Free tier and licensing for exactly what the timer does and does not cover.
First-run setup
The first time you launch Castiel, a four-step setup window opens before the main interface. It is a quick, reversible tour of the choices that shape the app: appearance, which modes to show, and how numbers and angles are formatted. Nothing you choose here is permanent - every setting can be changed later in Settings - and nothing is written to disk until you finish.
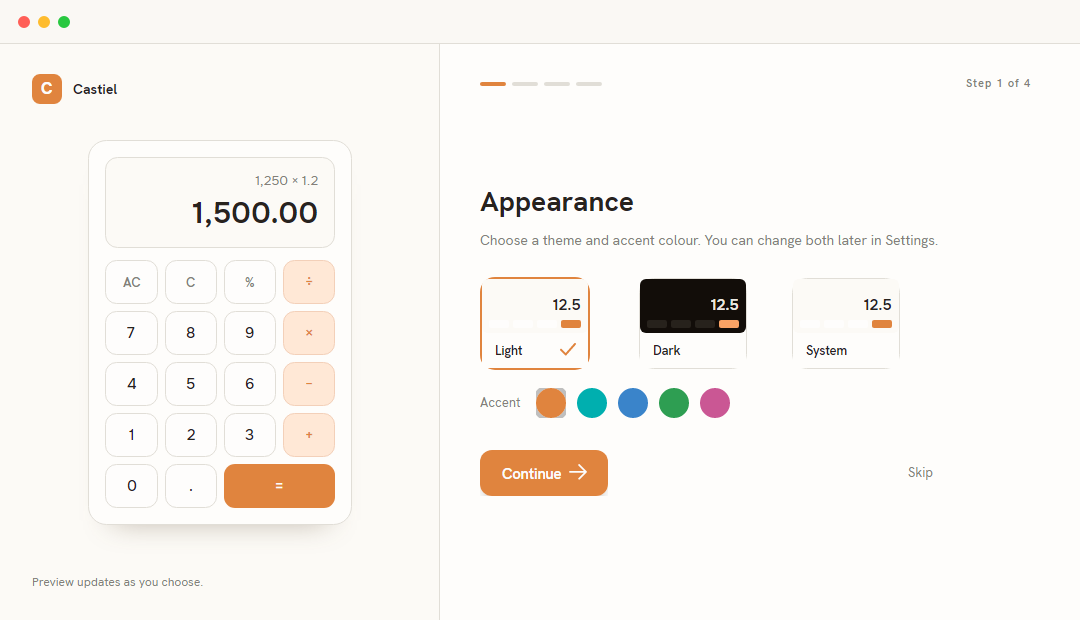
The window is split in two. On the left is a live mini-calculator preview that recolours as you make choices, under the Castiel wordmark, with the caption "Preview updates as you choose." On the right are four step dots and a STEP n OF 4 marker at the top, the step's content in the middle, and the navigation buttons (Back / Continue) at the bottom. A Skip option is available throughout.
Step 1 - Appearance. Choose a theme from three tiles - Light, Dark, or System (which follows your operating system's setting) - and an accent colour from five swatches: Amber, Teal, Blue, Green, and Magenta. Each choice recolours the left-side preview immediately so you can see the effect before committing.
Step 2 - Modes. Six cards, one per mode: Simple, School, Engineer, Financial, Programming, and Programming+. Simple, School, and Engineer are pre-selected. Toggle any card to add or remove that mode from the tab strip. The last remaining enabled mode cannot be switched off, so you always keep at least one. Modes you leave out here are only hidden from the strip, not disabled - you can bring them back later from Settings.
Step 3 - Numbers and language. Set how numbers read and how angles are measured:
- Decimal separator -
Point(1.5) orComma(1,5). - Digit grouping -
1,234,1.234,1 234, orNone. - Angle unit -
Degrees,Radians, orGradians. This sets the angle mode that trigonometric functions use. - Language - a dropdown. English is the only active option for now; other languages are listed but not yet selectable.
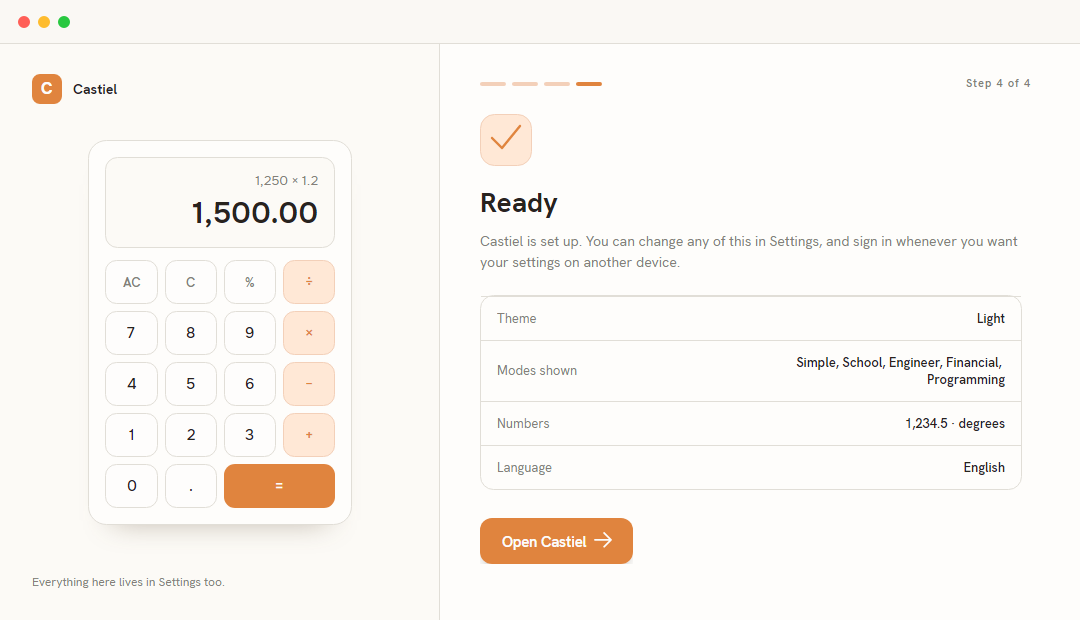
Step 4 - Ready. A checkmark and a summary table restate your choices - theme, the modes you enabled, your number format, and language - so you can confirm them at a glance. The primary button reads Open Castiel; clicking it saves every choice and opens the main window. There is no "Sign in" button, because Castiel has no account system.
Skipping, and closing early. Skip accepts the default values for everything (the same as the pre-selected state on each step) and opens the app straight away. Your choices are held only in memory as you go: nothing is saved until you press Open Castiel or Skip. If you close the setup window before finishing either way, that session's choices are discarded and the setup greets you again on the next launch. If you ever want to run the setup again after that, launch Castiel with the --onboarding flag.
Where to go next
Pick the mode you want to learn and open its chapter:
- Simple mode - the four-function everyday keypad.
- School - the scientific workspace and its family of apps.
- Engineer - computer algebra, numerical methods, units, and constants.
- Financial - time value of money and cash-flow work.
- Programming - authoring calculator programs.
Two shared surfaces underpin every mode:
- The paper tape - the editable, reactive log that runs through all six modes.
- Settings - theme, accent, language, which modes are shown, and more.
- Free tier and licensing - what is always free, and how the 30-minute timer works.