Chapters
The Programming recorder
The Recorder is where a Catena sequence begins as an ordinary calculation. Instead of typing program text, you perform the calculation on a built-in calculator, and every step you take is captured as a typed, colour-coded line in a live sequence beside it. It is the friendliest way into Programming mode: if you can work a scientific calculator, you can author a sequence.
You reach the Recorder from Programming mode (the Programming tab in the title bar), then the Learn tile on the apps rail down the left edge. It is the default surface, so it is what opens when you first enter Programming mode. Use it when you want to build a short, linear program by example - ask for a number, do some arithmetic, store and show a result - and then hand that program on to the Listing or Blocks views for finishing. For the wider picture of Programming mode and how its surfaces fit together, see the Programming overview.
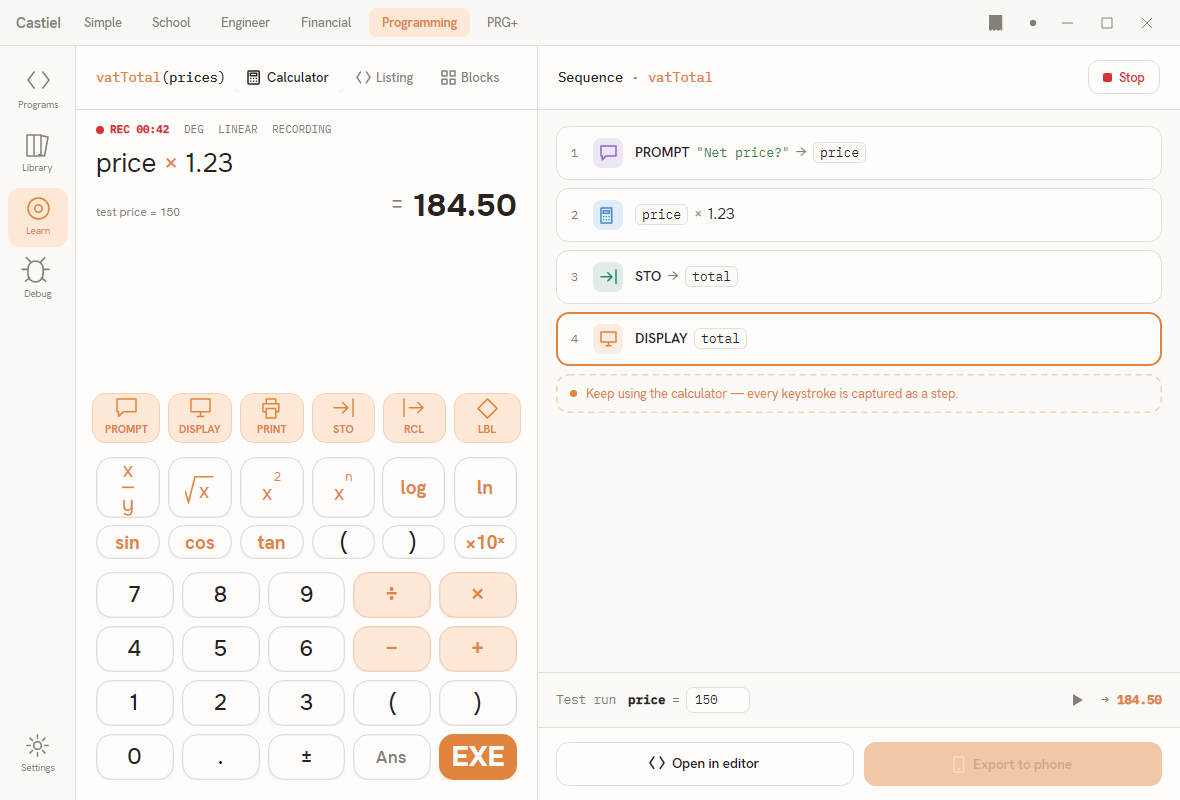
The window has three working areas. The apps rail on the left (Programs, Library, Learn, Debug, Settings) selects the Programming surface; Learn is highlighted here. The calculator column in the centre is the machine you drive: a display on top, a strip of program keys, and a scientific keypad below. The sequence panel on the right is the growing program - each committed step as its own numbered, colour-coded row. A segmented control in the surface header (Calculator / Listing / Blocks) switches between this recording view and the two editor views of the same sequence.
What "recording" means
Recording is the whole idea of this surface. You do not write code; you carry out a calculation, and the Recorder writes the code for you. Each meaningful action - asking for an input, performing an arithmetic step, storing a result, showing a value - becomes one line in the sequence on the right, rendered in the colours and keywords of the Catena language. When you finish, that sequence is a complete, runnable program.
Recording is off when the surface first opens, on purpose: the calculator behaves as a normal calculator so you can find your footing. The first deliberate authoring action - pressing a program key, or pressing EXE to commit a calculation - arms recording automatically, and from then on your steps are captured. A REC badge with an elapsed timer (REC 00:42 in the screenshot) and a RECORDING annunciator confirm that capture is live. You can also start and stop capture yourself with the button in the sequence-panel header (see Turning recording on and off below).
While recording, a dashed hint sits under the last step - "Keep using the calculator - every keystroke is captured as a step." - and the most recently added row carries a bright accent outline so you can always see what you just committed.
The calculator column
The display. The top of the column is a status strip - the REC badge and timer, then DEG (the angle mode), LINEAR (the Recorder uses single-line entry, not the stacked textbook notation of the School calculator), and RECORDING. Below it, the entry line echoes the expression you are building (price × 1.23 in the screenshot), and the large result to the right shows the value from the last test run (= 184.50), with a small dim annotation above it recording the inputs used (test price = 150).
The program-key strip. The six accent-tinted keys directly under the display are what set the Recorder apart from a plain calculator. Each one contributes a program-specific statement to the sequence, and each opens a small inline entry asking for whatever it needs:
| Key | What it asks for | What it records |
|---|---|---|
PROMPT |
a message and a variable name | asks the user for a number at run time and stores it in that variable |
DISPLAY |
a value | shows a value on screen |
PRINT |
a value | prints a value |
STO |
a variable name | stores the current result into that variable |
RCL |
a variable name | recalls a stored variable into the calculation you are building |
LBL |
a label name | names this point in the sequence |
DISPLAY and PRINT default to the variable you most recently stored, so a ... STO total followed by DISPLAY shows total without you having to name it again.
The keypad. Below the program keys is a trimmed scientific keypad - x/y, √x, x², xⁿ, log, ln on the first row and sin, cos, tan, (, ), ×10ˣ on the second - over the familiar number block (0-9, ., ±, the four operators ÷ × − +, a pair of parentheses, Ans, and the solid accent EXE). You use these exactly as you would on any calculator: they build the arithmetic of each step. EXE commits the current expression as a calculation step in the sequence.
The sequence panel: colour-coded steps
Every committed step is a numbered row in the panel on the right. A coloured, rounded icon badge on the left of each row tells you at a glance what kind of step it is; the rest of the row spells the statement out in Catena keywords, operators, and variable chips.
The colour coding by kind. The badge colour is the step's category:
| Step kind | Badge colour | What it is |
|---|---|---|
| Prompt | purple | A PROMPT line that asks for a number and stores it in a variable |
| Calculation | blue | An expression or assignment - the arithmetic you keyed (for example price × 1.23) |
| Store / recall | green | STO (store the current result into a variable) or RCL (recall one) |
| Display / print | amber | A DISPLAY or PRINT line that shows or prints a value |
| Label | amber | An LBL marker that names a point in the sequence |
These are the same colour families the Blocks palette uses for its categories - input/output, maths, variables, and control - so a step's colour here is the colour of its block there. Learning the colours in the Recorder means you already know your way around the Blocks view.
Reading a row. Within a row, the parts are styled by role: uppercase keywords (PROMPT, STO, DISPLAY) in the category colour, variable names as small rounded code chips (price, total), quoted text in green ("Net price?"), and operators as their typographic glyphs (×, −, ÷, and the → that points a value into a variable). So the four steps in the screenshot read as a small program:
PROMPT "Net price?" → price(purple)price × 1.23(blue)STO → total(green)DISPLAY total(amber)
Turning recording on and off
The button at the top-right of the sequence panel toggles capture. While recording it shows a red square and reads Stop; once stopped it shows a red dot and reads Record. Stopping is respected - after you press Stop, the Recorder will not silently resume on the next keystroke; you have to press Record to continue. (Before you have ever touched the toggle, the first authoring action arms recording for you, so the keys are never dead when you begin.)
Use Stop when you want to try a calculation on the calculator without adding it to the program, then Record again to resume authoring. The REC timer counts the time spent recording.
Testing the sequence as you build
At the foot of the sequence panel is a Test run bar. Because a recorded program can ask for inputs, the Recorder gives you one entry field per PROMPT in the sequence - price = 150 in the screenshot. Type a value into each field and press the run (triangle) button; the whole sequence runs for real with those inputs, and the result appears inline (→ 184.50) and on the calculator display above. If a field does not hold a number, or the sequence has an error, the bar reports the problem instead of a result. The test fields update themselves as you add or remove PROMPT steps, and they remember values you have already keyed.
Editing, removing, and finishing steps
The sequence panel is a live view of the program, not a separate copy - it is the same sequence the Listing and Blocks views show. To change or remove a step, switch to an editor view: press Open in editor in the footer, or use the Listing / Blocks tabs in the surface header. In the Listing view each step is an editable line you can rewrite or delete; in the Blocks view each step is a block you can rearrange or remove. Any change you make there is reflected back everywhere, because all three views render the one underlying sequence.
While you are still building a single step, the keypad's delete and AC keys clear the in-progress entry before you commit it; they do not touch steps already recorded. The footer's Export to phone action is reserved for a future release and is shown disabled until the Castiel mobile app ships.
The result is a real Catena sequence
Everything the Recorder captures is ordinary Catena. The moment you switch the header to Listing, you see the same program as editable source; switch to Blocks and you see it as a stack of category-coloured blocks. Nothing is lost or approximated in the translation - the recording, the listing, and the blocks are three views of one program. That means you can begin a sequence here by example, refine its logic in the Listing view, tidy its structure in the Blocks view, and run it under the debugger, all without leaving Programming mode. To understand the language the Recorder is writing on your behalf, see The Catena language.
Worked example: a VAT-total sequence
The screenshot builds a short program that takes a net price, adds 23% VAT, and shows the total - the vatTotal sequence. Here is the flow, from an empty Recorder.
- Press
PROMPT. In the inline entry, type the messageNet price?and the variable nameprice, then confirm. Step 1 appears in purple:PROMPT "Net price?" → price. Recording arms itself on this first action, and theRECtimer starts. - Build the calculation. Press
RCL, enterpriceto pull that variable in, then press×and type1.23. The display echoesprice × 1.23. - Press
STOand entertotal. This commits the calculation as step 2 in blue (price × 1.23), then records the store as step 3 in green (STO → total) - the store keeps the value the calculation just produced. - Press
DISPLAY. Becausetotalwas the last variable stored, it fills in automatically. Step 4 appears in amber (DISPLAY total) with the accent "new" outline marking it as the latest step. - Test it. In the Test run bar, set
price = 150and press the run button. The sequence runs and returns→ 184.50(150 × 1.23), shown both in the bar and on the calculator display.
You now have a four-line, runnable Catena sequence, authored entirely by working the calculator. Switch the header to Listing or Blocks to see the same program in either editor, or carry on recording to extend it.
Related chapters
- Programming overview - the mode as a whole and how its surfaces relate.
- Blocks - the visual block editor and the palette categories whose colours the steps share.
- Listing - the code editor view of the same sequence, with the debugger.
- The Catena language - the language the Recorder writes for you.