Chapters
The Blocks view
The Blocks view shows your sequence as a stack of visual, colour-coded cards instead of as text. Every statement in the sequence becomes one block: a coloured face carrying a short uppercase tag (SET, IF, DISPLAY) and a compact one-line summary of what the statement does. Nested statements - the body of a loop or the branches of an IF - sit indented under their parent, so the shape of your program is visible at a glance. It is the gentlest way into Catena authoring: you assemble a sequence by clicking blocks from a palette and editing them through simple labelled forms, without typing a line of code.
You reach the Blocks view from the segmented control in the surface header, which offers Calculator / Listing / Blocks. Switch to Blocks whenever you want to see the structure of a sequence, drop in a new statement from the palette, or edit a step through a guided dialog rather than by hand. The Blocks view is a rendering of the same sequence you can also open as text in the Listing; the two are always in step, because they are two views of one program. For how sequences and the Programming mode fit together, see the Programming overview.
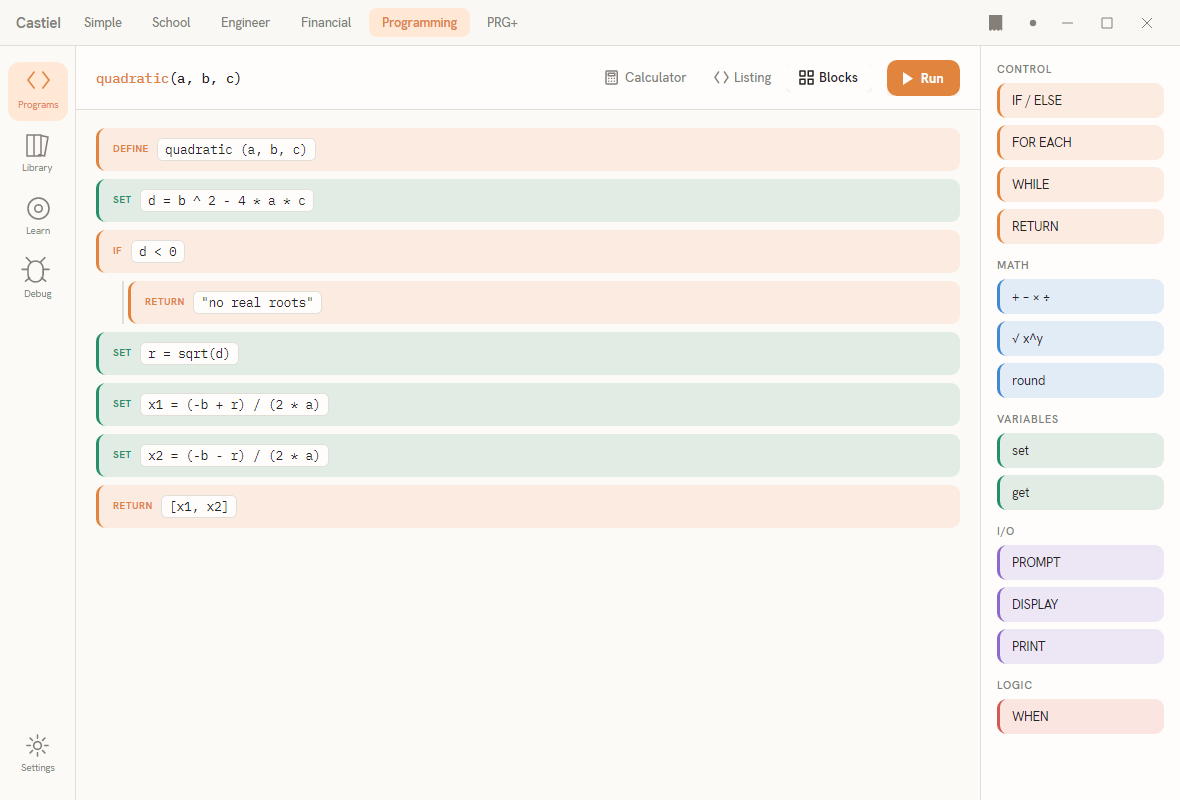
The surface has two parts: the blocks canvas fills most of the width and shows your sequence as the stack of cards described above; the palette is the narrow column down the right edge, grouped into the categories CONTROL, MATH, VARIABLES, I/O, and LOGIC. Clicking a chip in the palette adds a matching statement to the sequence; clicking a block on the canvas selects it; double-clicking a block opens its edit dialog.
Reading a block
Each block is a soft-filled card with a 3-pixel coloured bar down its left edge. Reading a block left to right: the coloured tag - a short uppercase keyword - followed by a code chip holding the one-line summary of the statement. A block that has a body (a loop, an IF, a WHEN) shows its child blocks indented beneath it along a nesting rail, so you can always see which steps run inside which.
The colour is not decoration - it tells you the block's category, and the palette uses the same five colours so a chip and the block it produces always match:
| Category | Colour | What lives here |
|---|---|---|
CONTROL |
warm amber | The flow of the program: IF / OTHERWISE, the loops (FOR EACH, REPEAT, WHILE), RETURN, BREAK, CONTINUE, and the sequence's own DEFINE header. |
MATH |
blue | A bare calculation - a CALC block that evaluates an expression such as s * s. |
VARIABLES |
green | Storing and recalling values: SET (assign a variable), STO, and RCL. |
I/O |
violet | Talking to the user and the tape: PROMPT, DISPLAY, PRINT, OUT. |
LOGIC |
red | The WHEN rule, which fires an action whenever a condition becomes true. |
A sixth, neutral category covers blocks that are not on the palette - a comment (#), a CALL to another sequence, or any statement the visual editor does not have a dedicated form for. These still render faithfully as their own blocks so nothing is ever silently dropped from the view.
How statements become blocks. The tag is drawn from the statement itself, so you can read a whole sequence by its tags without opening a single block:
| You wrote (in the sequence) | The block shows |
|---|---|
x = 5 * 2 (assign a variable) |
a green SET block reading x = 5 * 2 |
Ans + 1 (a bare expression) |
a blue CALC block reading Ans + 1 |
DISPLAY total / PRINT total / OUT total |
a violet block tagged DISPLAY, PRINT, or OUT |
PROMPT "Value?" -> x |
a violet PROMPT block reading "Value?" -> x |
IF Ans > 0 … |
an amber IF block, with the body indented beneath it |
a loop or RETURN |
an amber FOR EACH / REPEAT / WHILE / RETURN block |
WHEN Ans < 0 ALWAYS … |
a red WHEN block, with its action indented beneath |
quadratic(a, b, c) (call a sequence) |
a CALL block reading quadratic(a, b, c) |
Adding a block from the palette
The palette on the right is your source of new statements. Each category holds a few ready-made chips:
CONTROL-IF / ELSE,FOR EACH,WHILE,RETURN.MATH-+ − × ÷(a plain calculation),√ x^y,round.VARIABLES-set(store a value into a variable),get(recall one).I/O-PROMPT,DISPLAY,PRINT.LOGIC-WHEN.
Click a chip and its statement is appended to the end of the sequence, ready to edit. The chips insert a sensible skeleton - PROMPT drops in PROMPT "Value?" -> x, DISPLAY drops in DISPLAY Ans, + − × ÷ drops in Ans + 1 - which you then adjust to your own values. Because the palette adds to the end, the usual rhythm is to lay the steps down in order and then edit each one.
Editing a block
Select a block by clicking it once; the card highlights. Edit it by double-clicking, which opens a small edit dialog tailored to that kind of statement. The dialog has a title naming the statement (for example Set a variable or PROMPT statement), one or more labelled fields for the parts you can change, and Save / Cancel buttons.
The fields are always the meaningful parts of that statement, never raw code. A few examples:
- A
SETblock offers a Variable field and a Value field. - A
PROMPTblock offers a Message field (the question the user sees) and a Variable field (where the answer is stored). - An
IFblock offers a Condition field. - A
FOR EACHloop offers a Variable field and an In field (the collection to walk through). - A
DISPLAY/PRINTblock offers a Value field.
Type your changes and press Save. If an entry does not make sense - an empty or malformed expression, or a variable name that is not a plain name of letters, digits, and underscores - the dialog keeps itself open and shows the problem in red so you can correct it; nothing is committed until the values are valid. Press Cancel to close without changing anything.
Reordering, moving, and clearing up. Right-click a block for its full menu: Edit, Move up, Move down, Cut, Copy, Paste, and Delete. Move up and Move down shuffle a step within its list; Cut and Copy place the block on the clipboard as Catena text (so you can paste it elsewhere, even into the Listing); Paste drops the clipboard's block in after the selected one; Delete removes it. The DEFINE header and the OTHERWISE branch marker are structural blocks, not statements you authored, so their editing actions stay disabled.
One model: blocks and the Listing
The Blocks view does not hold a program of its own. The blocks are generated from the parsed sequence - Castiel reads the sequence text, works out its structure, and draws one block per statement. The Listing is the source of truth: whatever you do in Blocks - insert a palette chip, edit a field, reorder or delete a card - is written straight back into that one shared sequence, and re-rendered. Switch to the Listing and you will see the exact text your blocks describe; switch back and the blocks reflect any edits you made as text. There is only ever one program; Blocks and Listing are two windows onto it.
This is why the blocks always read in canonical form. When you save an edit, the value you typed is folded back into the sequence and the block is redrawn from the result, so spacing and bracketing come out consistent every time.
Worked example: prompt, compute, display
Here is a whole small sequence built without typing any code - it asks for a side length, squares it, and shows the area of the square.
- Switch the surface header to Blocks.
- In the palette, click the
PROMPTchip (underI/O). A violetPROMPTblock appears reading"Value?" -> x. - Double-click that block. In the dialog, set Message to
Side length?and Variable tos, then press Save. The block now readsPROMPT "Side length?" -> s. - Click the
+ − × ÷chip (underMATH). A blueCALCblock appears readingAns + 1. - Double-click it, set Expression to
s * s, and Save. The block now readsCALC s * s- the area of the square. - Click the
DISPLAYchip (underI/O). A violetDISPLAYblock appears readingAns, which shows the value just computed.
You now have three stacked blocks - a PROMPT, a CALC, and a DISPLAY - that read top to bottom as the whole program. Switch to the Listing to confirm the text, or press Run in the header to execute it: the sequence asks for the side length, and the DISPLAY step writes the area to the shared paper tape. To capture a sequence by pressing keys instead of assembling it, see the Recorder.
Related chapters
- Programming overview - the Programming mode and how sequences work.
- The Listing - the same sequence as editable text, the source of truth behind the blocks.
- The Recorder - building a sequence by pressing calculator keys.
- Catena control flow - what
IF, the loops,WHEN, andRETURNmean in a sequence.