Chapters
The School geometry board
School Geometry is Castiel's dynamic geometry workspace: a place to construct a figure - points, segments, lines, circles, polygons and the classic ruler-and-compass constructions - and then drag a free point and watch every dependent object move with it. Nothing is a static drawing. When you build a midpoint on a segment and then drag one endpoint, the midpoint keeps being the midpoint. That living relationship between a construction and its parts is what the board is for, and it is what makes it a good place to discover a theorem rather than just read one.
You reach it from the Geometry tile on the left apps rail, alongside the other School surfaces. Use it whenever a problem is about shape, position, or relationship rather than a single number: constructing a triangle and its centres, exploring when three points stay collinear, tracing the path a point sweeps out, or measuring an angle and seeing how it changes as you move a vertex. For plotting a function against axes, use Graph instead; for the wider set of School tools, see the School apps.
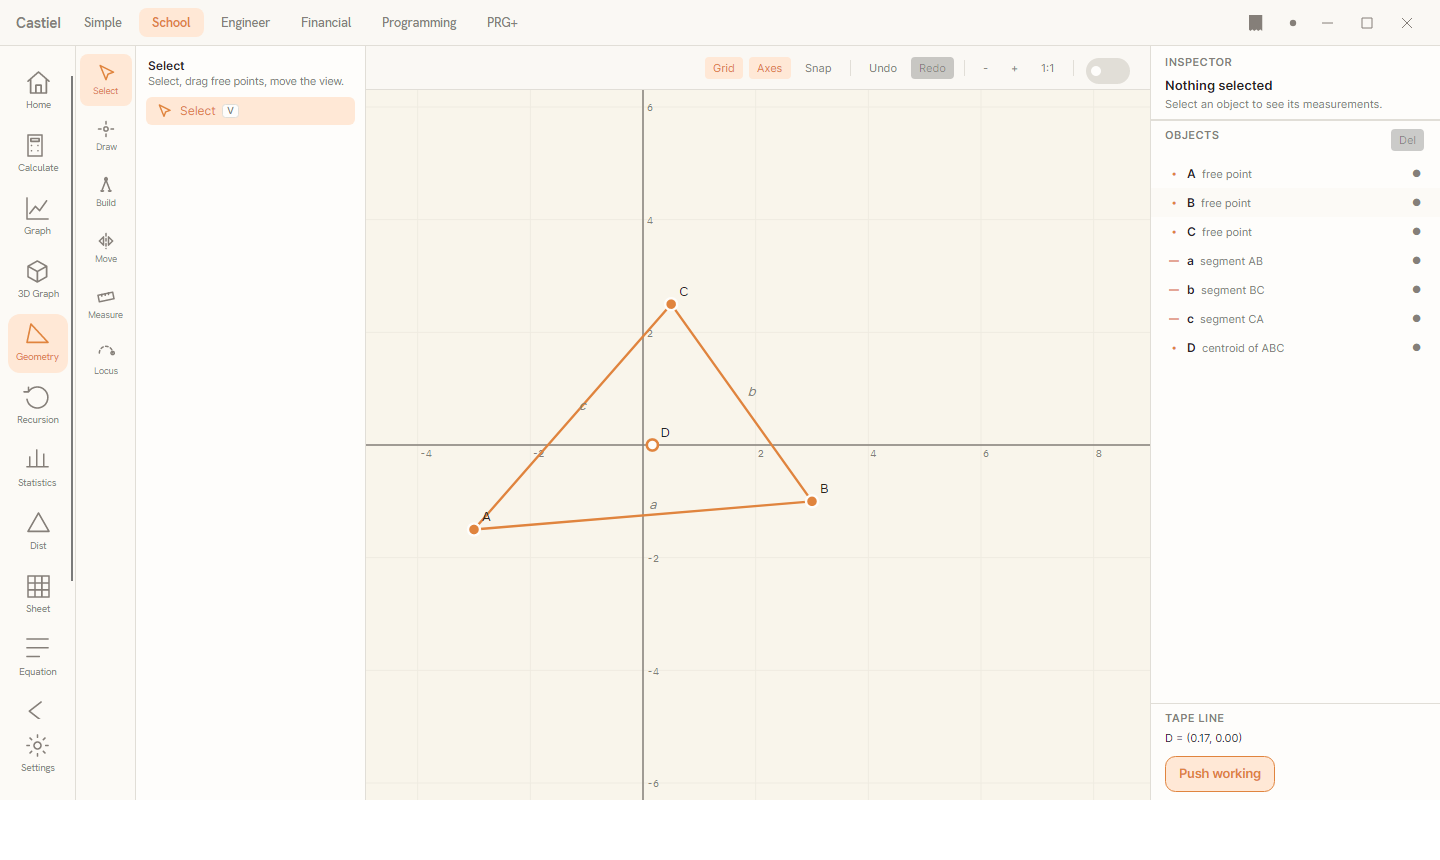
The window has four regions. Down the left edge is a narrow tool palette of icon groups. Clicking a group opens its flyout - a floating list of the individual tools in that group. The large centre area is the workspace: a coordinate canvas with a toolbar strip across the top. Down the right edge is a panel carrying the Inspector, the Objects list, and the tape line. A construction prompt appears along the top of the canvas whenever a tool is waiting for your next click.
The workspace toolbar
The strip above the canvas carries the view controls, reading left to right:
| Control | What it does |
|---|---|
Geometry + a percentage |
The surface title and the current zoom readout. |
Grid |
Shows or hides the coordinate grid. |
Axes |
Shows or hides the x and y axes. |
Snap |
When on, new points land on whole-number grid coordinates instead of anywhere you click. |
Undo / Redo |
Step back and forward through your construction. Each tool action is one step. |
− + 1:1 |
Zoom out, zoom in, and reset the view to 100% with the origin centred. |
Training |
A switch that turns Training mode on and off. |
Grid, Axes and Snap are toggles: they light up when active. Snapping is worth turning on while you learn - it keeps your first points on tidy coordinates so measurements come out clean.
The tool groups
The palette organises every tool into six intent groups. Click a group icon and its flyout opens over the left of the canvas, listing that group's tools with a short one-line description at the top. The groups are:
| Group | What it is for |
|---|---|
Select |
Select an object, drag a free point, or move the view. |
Draw |
Place points and draw segments, lines, circles, polygons. |
Build |
Construct midpoints, perpendiculars, intersections, centres. |
Move |
Transform an object: translate, rotate, reflect, dilate. |
Measure |
Measure lengths, angles, areas; test a property. |
Locus |
Trace a locus; animate a driver point. |
A few tools carry a single-letter keyboard shortcut, shown as a small key-cap on the right of the flyout row: V for Select, P for Point, S for Segment, L for Line, C for Circle, M for Midpoint, and I for Intersection.
How a construction tool works. Most tools are a short sequence of clicks. When you pick one, the prompt at the top of the canvas names the tool and tells you what to click next - for example the Midpoint tool asks you to Click the first point, then Click the second point, and creates the midpoint once it has both. Where a click needs an existing object, clicking empty space instead places a fresh free point there and uses it. Press Esc at any time to cancel a construction in progress.
Draw: placing points and figures
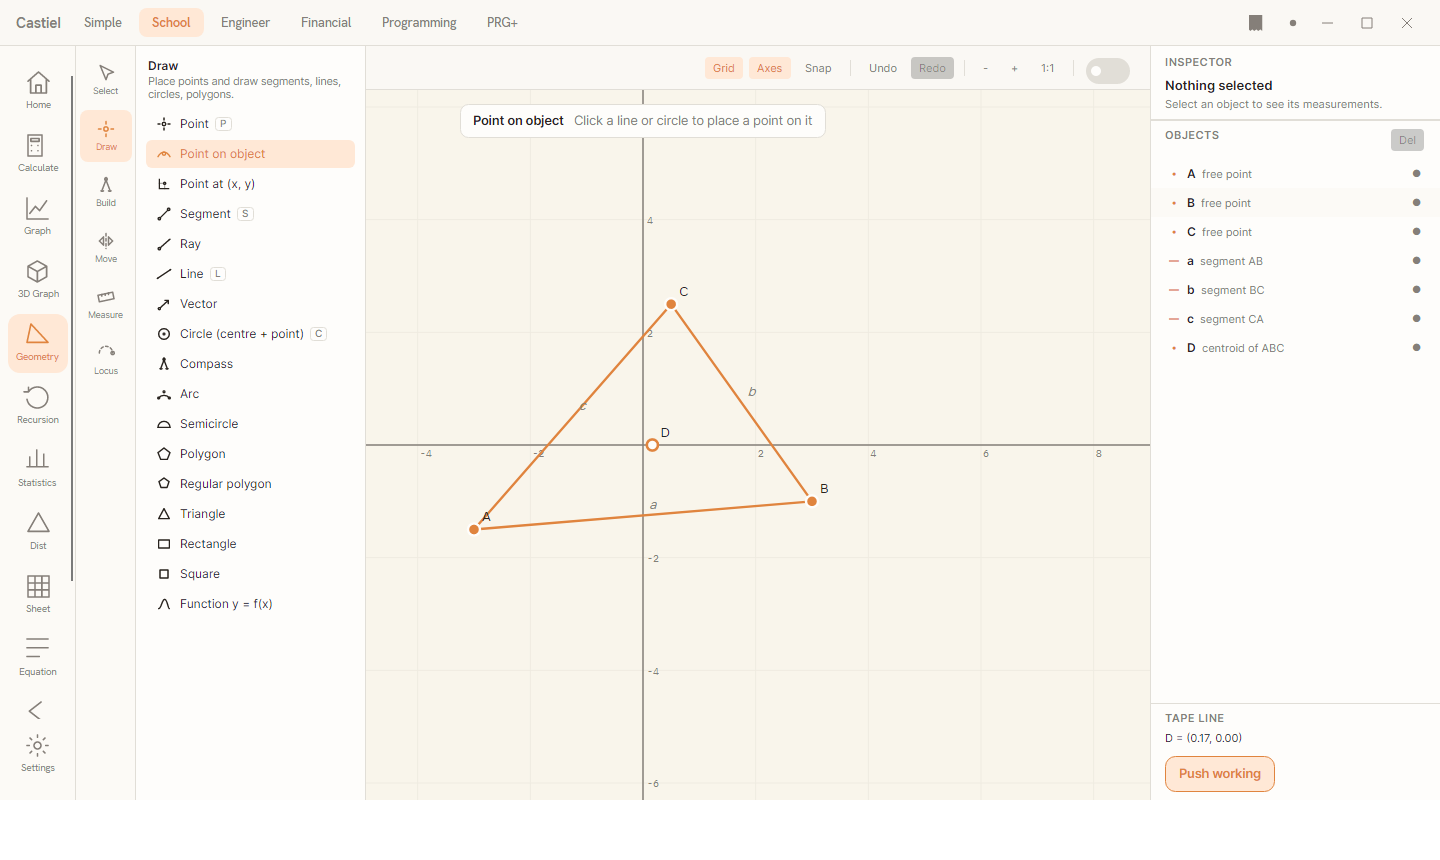
The Draw group is where a figure begins. Its tools:
| Tool | What it builds |
|---|---|
Point |
A free point. Click empty space to place it; click an existing point to grab it instead of stacking a duplicate. |
Point on object |
A point constrained to lie on a line or circle - it can slide along that object but never leave it. |
Point at (x, y) |
A point at coordinates you type in. |
Segment |
A straight segment between two points. |
Ray |
A ray from the first point through the second. |
Line |
An unbounded line through two points. |
Vector |
A directed vector from the first point to the second. |
Circle (centre + point) |
A circle by its centre and a point on the rim. |
Compass |
A circle whose radius is copied from an existing pair of points, drawn at a chosen centre. |
Arc |
An arc through three points. |
Semicircle |
A semicircle on two points as diameter. |
Polygon |
A polygon of any number of sides - keep clicking vertices, then click the first vertex again to close it. |
Regular polygon |
A regular polygon: click two points for one edge, then type the number of sides. |
Triangle |
A triangle from three clicked corners. |
Rectangle |
A rectangle: two clicks set the base, a third sets the height. |
Square |
A square from two clicked corners of one side. |
Function y = f(x) |
The graph of a function you type in, drawn on the geometry canvas. |
The distinction between a free point and a point on object matters for everything that follows. A free point you can drag anywhere. A point on object is tethered - dragging it moves it along its host line or circle. Both can drive a construction, but only a free point moves in two dimensions.
Build: constructions from existing objects
The Build group holds the ruler-and-compass constructions. Each one depends on the objects you feed it, so its result updates live when those objects move.
| Tool | What it builds |
|---|---|
Midpoint |
The midpoint of two points. |
Perpendicular bisector |
The perpendicular bisector of two points. |
Perpendicular line |
A line through a point, perpendicular to a chosen line. |
Parallel line |
A line through a point, parallel to a chosen line. |
Angle bisector |
The bisector of an angle given by three points (arm, vertex, arm). |
Intersection |
The crossing point of two objects (see below). |
Tangent to circle |
The tangent lines from an external point to a circle. |
Circle through 3 points |
The unique circle through three points. |
Centroid |
The centroid of a triangle's three vertices. |
Circumcentre |
The centre of the circle through a triangle's three vertices. |
Incentre |
The centre of a triangle's inscribed circle. |
Orthocentre |
The meeting point of a triangle's three altitudes. |
Intersections with two answers. A line can cross a circle in two places, and so can two circles. When that happens, the Intersection tool shows both candidate points labelled ① and ②, with the nearer one highlighted, and asks you to click the one you want. Where the objects only touch (a tangent contact) there is a single point and it is created directly.
Move: transforming objects
The Move group applies a geometric transformation and keeps the result linked to its source, so the image tracks the original as you drag.
| Tool | What it does |
|---|---|
Translate |
Slides a point along a chosen vector. |
Rotate |
Rotates a point about a centre by an angle you type in degrees. |
Reflect in line |
Mirrors a point across a chosen line. |
Reflect in point |
Reflects a point through a centre of symmetry. |
Dilate |
Scales a point away from a centre by a factor you type in. |
Apply saved transform |
Re-applies a transformation you have already built to another object. |
When you build a transformation it is remembered as a reusable saved transform, listed in a Saved transforms section of the right panel. Press its Apply button to arm it, then click the object you want it applied to - a quick way to send several objects through the same rotation or reflection.
Measure: lengths, angles, areas
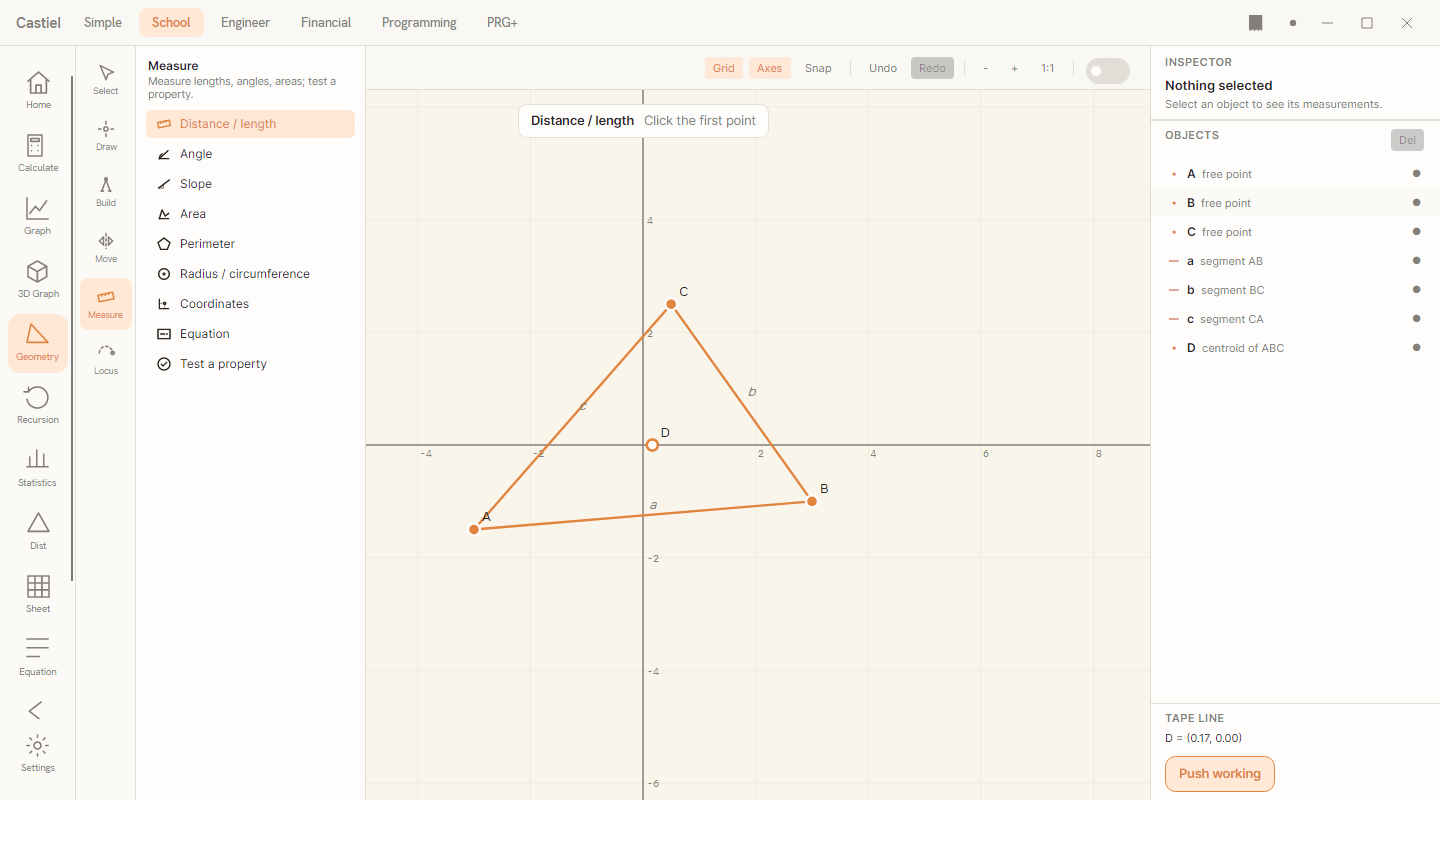
The Measure group reads a quantity off your figure and pins it to the canvas as a live label. A measurement is not a new object in the construction - it is a read-out that recomputes every time the figure moves.
| Tool | What it measures |
|---|---|
Distance / length |
The distance between two points (or the length of a segment). |
Angle |
The angle at a vertex, given three points: a point on one arm, the vertex, a point on the other arm. |
Slope |
The slope of a line or segment. |
Area |
The area of a polygon or circle. |
Perimeter |
The perimeter of a polygon. |
Radius / circumference |
The radius and circumference of a circle. |
Coordinates |
The coordinates of a point. |
Equation |
The equation of a line, or the centre-and-radius of a circle. |
Test a property |
Checks a relationship between two objects (see Testing a property). |
Because a pinned measurement is recomputed from the current figure, dragging any point that the measured quantity depends on updates the number on the canvas at once. That live number is the heart of the worked example below.
The right panel: Inspector, Objects, and the tape
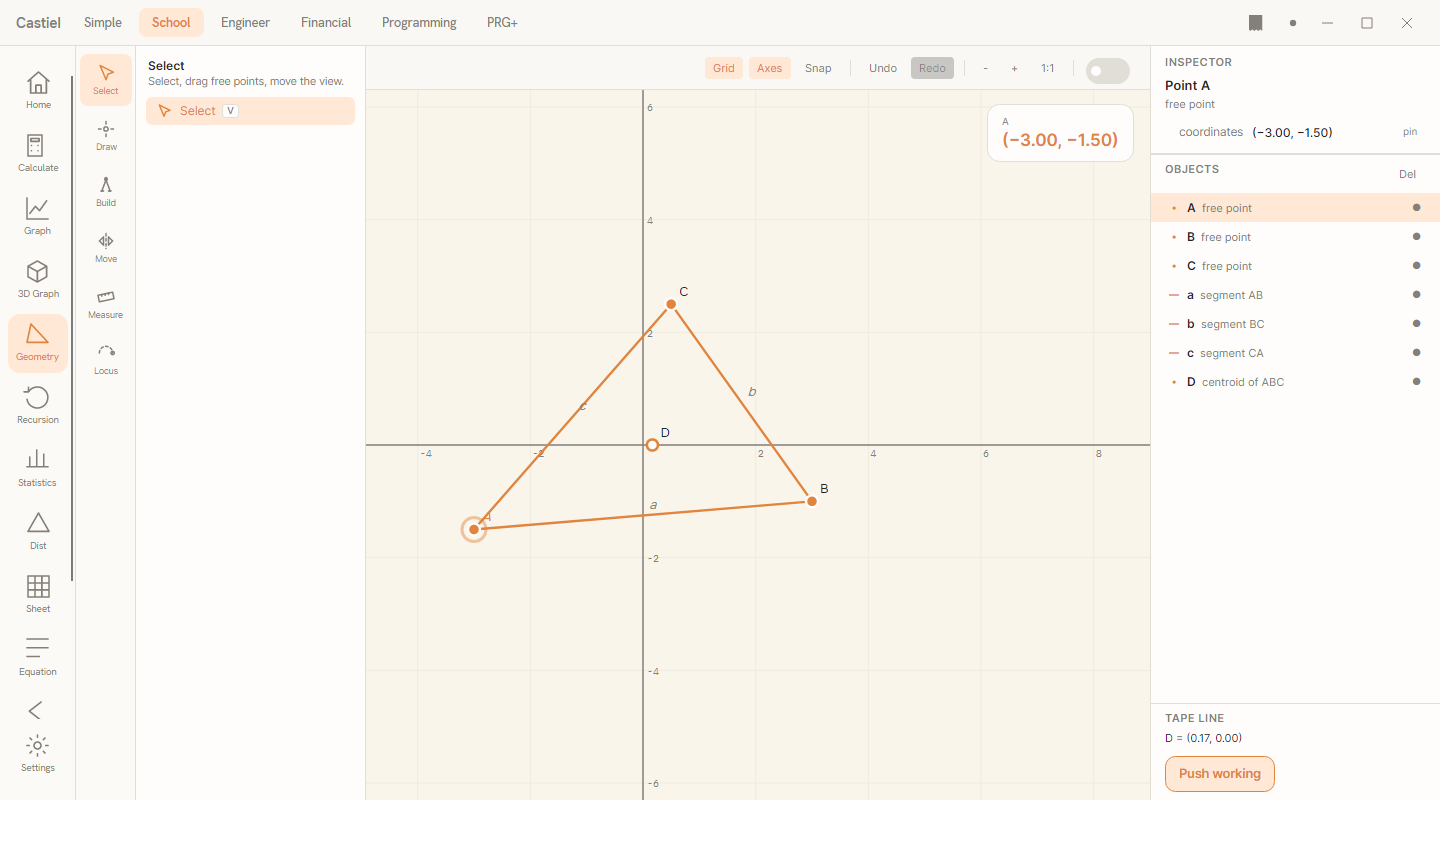
Select any object - click it on the canvas with the Select tool, or click its row in the Objects list - and the right panel fills in.
The Inspector (top) names the selected object and lists its measurements: a point shows its coordinates; a segment shows length, slope and equation; a circle shows radius, circumference, area and centre; a polygon shows area and perimeter. Each measurement row has a pin button that fixes that value onto the canvas as a live label, exactly like the Measure tools do. When a single point is selected, its coordinates also appear in a small read-out card in the top-right corner of the canvas.
The Objects list (lower down) is every object in your construction, in the order you built it, each with a type glyph, its label, and a plain-language dependency line ("midpoint of A and B", say) so you can see at a glance how the figure hangs together. An eye button on each row hides or shows that object; the Del button - or the Delete key - removes the selected object, and anything built from it goes too. If a construction becomes impossible for the current positions (an intersection whose objects no longer meet, for instance) its row is marked as waiting, and a hint invites you to drag back to a valid position.
The tape line and Push working (bottom) give a one-line summary of the most recent object. Press Push working to send the full step-by-step construction - every object and its dependency - to the shared paper tape, so a completed construction can be reviewed or exported like any other School working. For the full behaviour of the tape, see the paper tape.
Worked example: a triangle, an angle, and a drag
This is the whole point of dynamic geometry in one short exercise. Turn Snap on first so the points land cleanly.
- Open the Draw flyout and pick
Triangle. Click three places on the canvas for the corners. Castiel labels them (A,B,C) and draws the triangle. - Open the Measure flyout and pick
Angle. The prompt asks for three points. Click a point on the first arm (sayA), then the vertex (B), then a point on the second arm (C). The angle ∠ABC appears as a live label on the canvas, in degrees. - Switch to the Select tool (or press
V). Click and drag vertexA.
As you drag, the triangle deforms and the angle label at B counts up or down in real time - the measurement is recomputed on every frame, not frozen at the value it had when you took it. Let go and the figure keeps its new shape. This is the difference between measuring a drawing and measuring a construction: the number is bound to the geometry, so exploring "what if I move this?" is a matter of dragging, not rebuilding.
Select the triangle's polygon afterwards and the Inspector will show its area and perimeter; pin either one and it, too, will track the next drag.
Locus and animation
The Locus group captures motion. It has two tools:
Locus- traces the path swept out by one point (the traced point) as another point (the driver) moves along its host object. The driver must be a point on object, since that is the point with a path to sweep. Pick the driver, then the traced point, and Castiel draws the whole locus curve.Animate- sweeps a driver point along its object automatically, looping, so you can watch the dependent construction move without dragging. Pick the point-on-object to animate; pressEscto stop.
A classic use: put a point on a circle, build something from it (a midpoint to a fixed point, say), then trace the second point's locus as the first runs around the circle. Animate the driver and the relationship reveals its shape on its own.
Training mode
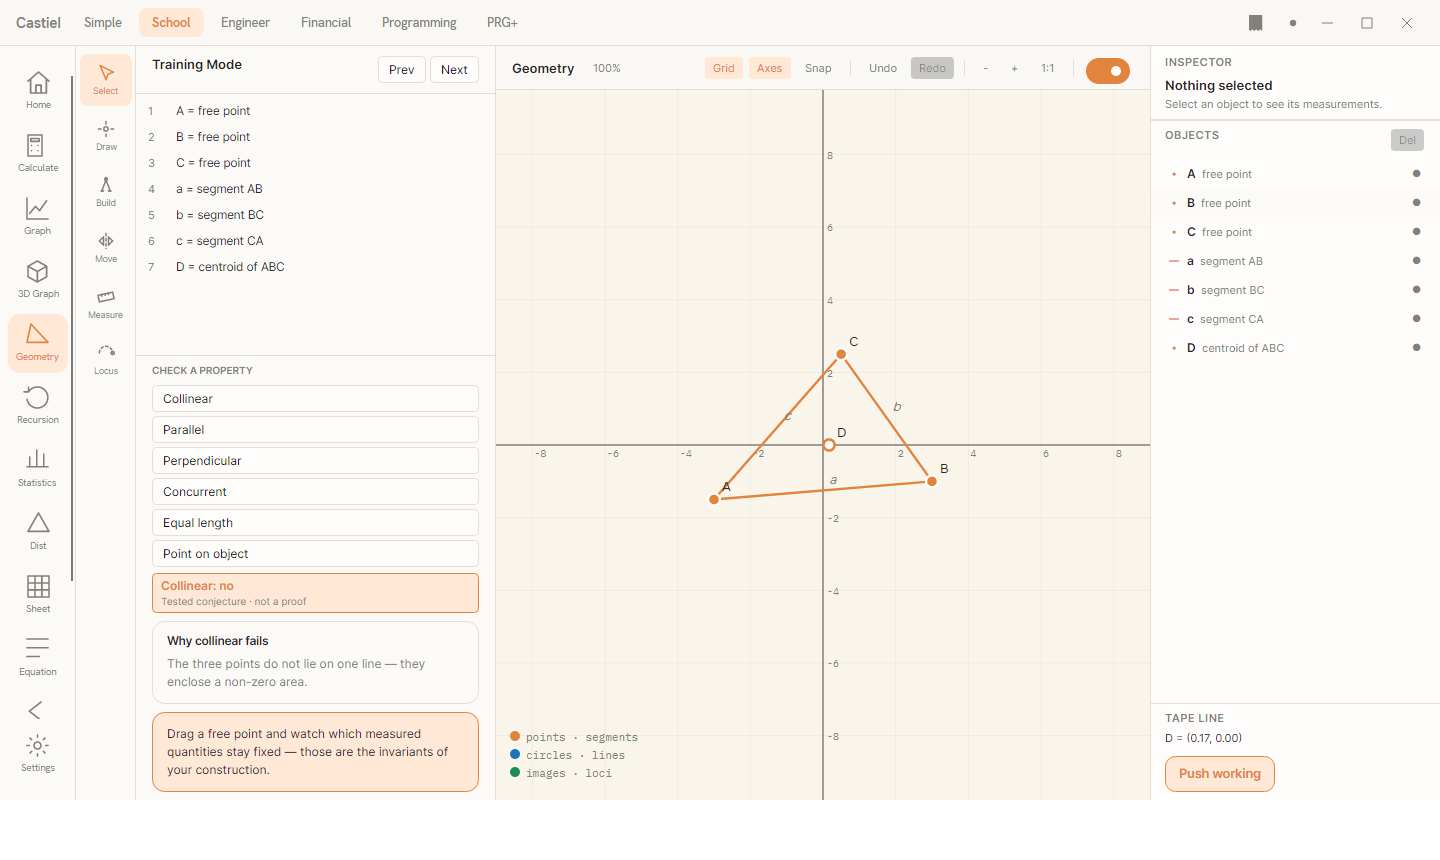
The Training switch on the toolbar turns the board into a guided study surface. A Training column opens beside the palette with two features.
Step playback. Your construction is listed as numbered steps. The Prev and Next buttons walk through them one at a time, ringing the object built at each step on the canvas, so you can replay how a figure was assembled.
Property checks. Below the steps is a CHECK A PROPERTY panel with buttons for the relationships worth testing: Collinear, Parallel, Perpendicular, Concurrent, Equal length, and Point on object. Select the objects involved, press the matching button, and Castiel returns a verdict - a green result when the property holds, a warm-accent result when it does not - together with a plain-language explanation of why. A standing prompt reminds you of the technique that makes this powerful: drag a free point and watch which measured quantities stay fixed. Those unchanging quantities are the invariants of your construction - the properties that are true by construction rather than by coincidence, which is exactly what a geometric theorem is.
The same relationship check is available outside Training mode as the Test a property tool in the Measure group.
<a id="testing-a-property"></a>
Testing a property directly. From the Measure flyout, Test a property asks you to click two objects and then reports the relationship between them, with the same green/accent verdict and explanation. It is the quick way to ask "are these two lines actually parallel?" without leaving your current tool flow.
Related chapters
- The School graph - plotting functions against axes, a different kind of picture.
- Trigonometry - the angle measures behind the geometry board's angle read-outs.
- The paper tape - where
Push workingsends a completed construction. - The School apps - Graph, Statistics, Equation, and the rest of the rail.