Chapters
Programming mode
Programming mode is where Castiel stops being a calculator you press and becomes a calculator you can teach. Instead of working one expression at a time, you build a sequence - a small program, written in Castiel's Catena language - that captures a whole procedure: prompt for some values, do the arithmetic, make a decision, print a result. Once written, a sequence runs on demand and can take inputs, so a calculation you would otherwise repeat by hand becomes a single named thing you run again and again.
You reach Programming mode from the mode switcher, the same way you reach Simple, School, Engineer, or Financial. It suits anyone who finds themselves keying the same steps repeatedly, or who wants a calculation to ask questions, branch, or loop. If you have never programmed before, that is fine - Programming mode is built so you can start by recording keystrokes and never type a line of code. A sister mode, Programming+, is identical but adds an AI assistant panel that can draft a sequence for you from a plain-English description; it is described near the end of this chapter.
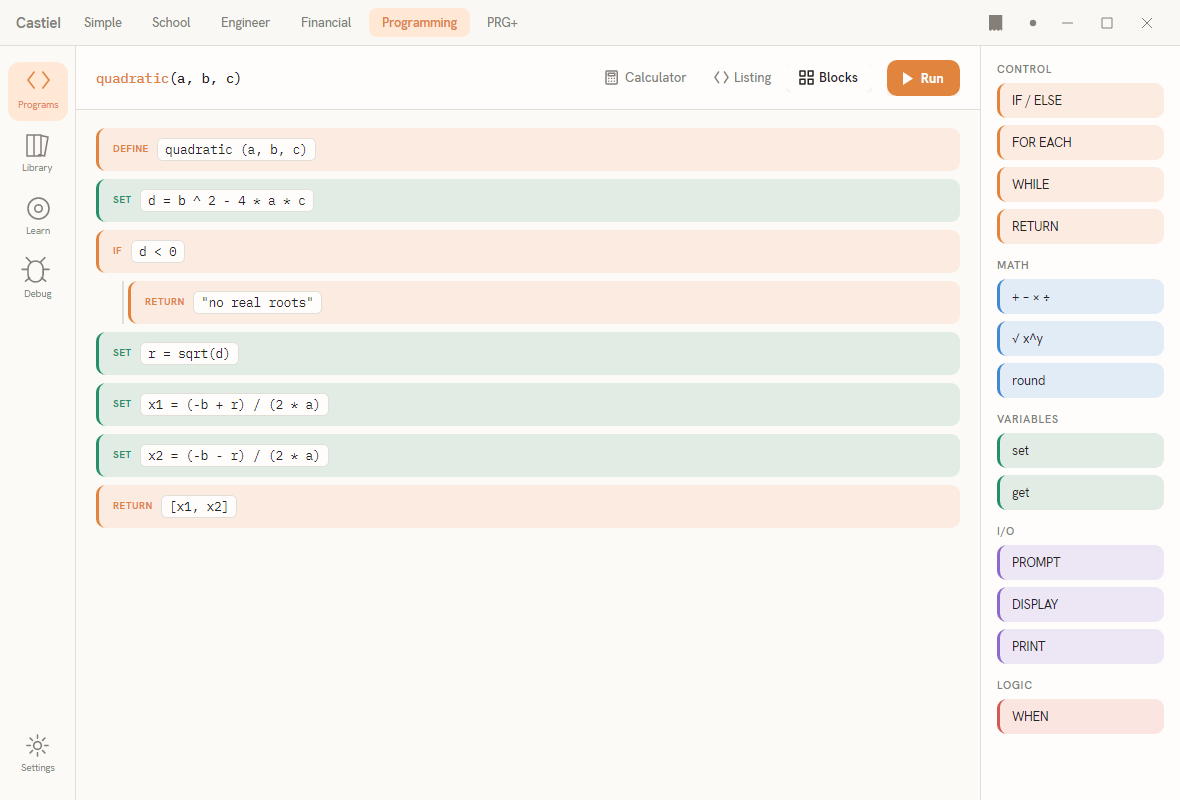
The window has two regions. Down the left edge is a narrow apps rail of surface icons. Filling the rest of the window is the active surface - the workspace you are currently using. Which surface is showing depends on two controls: the rail on the left, and a segmented view toggle in the header above the workspace. The rail chooses what you are doing (writing programs, browsing your library, learning, debugging, or changing settings); the view toggle chooses how you see the sequence you are editing.
One sequence, three views
The idea at the heart of Programming mode is that a sequence is a single thing you can look at three different ways. The header's segmented toggle switches between them:
- Calculator - the Recorder. You work an ordinary scientific calculator, and every keystroke is written down as a step of the sequence. This is the way in for people who do not want to write code: you calculate, and the program builds itself.
- Listing - the sequence as text, in a code editor with line numbers. This is the definitive form of a sequence: the Recorder and the Blocks are both convenient pictures of this underlying text, and whatever the text says is what the sequence is.
- Blocks - the sequence as visual blocks, colour-coded by category and nested to show structure. You assemble a program by clicking pieces from a palette, in the spirit of Scratch.
These are not three separate copies you keep in sync by hand. They are three renderings of one program. Edit in any view and the other two update to match - record a few keystrokes and they appear as blocks and as text; drag a block and the listing rewrites itself; type in the listing and the blocks rebuild. Switch views whenever one is clearer than another for the task in front of you.
The header also shows the sequence name on the left (with its parameter list beside it) and, on the Listing and Blocks views, a Run button on the right that executes the sequence. The Calculator view has its own inline test-run control instead, so it does not repeat the Run button.
The apps rail
The rail down the left edge has five entries. The top group holds the four working surfaces; Settings sits on its own at the foot.
| Rail entry | What it opens |
|---|---|
Programs |
Your sequences - the default working area, where you author, view, and run a sequence through the Calculator / Listing / Blocks views. |
Library |
The collection of saved and shared sequences you can open, reuse, and manage. See the Library. |
Learn |
Guided material for getting started with sequences and the Catena language. |
Debug |
The debugger. Selecting it switches the workspace to the Listing view and replaces the side console with a debugger panel - variable watch, call stack, and breakpoints. See the debugger. |
Settings |
The shared Settings window (angle mode, number format, appearance, connectors, and the rest), the same one every mode opens. |
The rail sets the context; within the Programs context you still choose Calculator, Listing, or Blocks from the header toggle. Choosing Debug from the rail is the one case where the rail also forces a view: it moves you to the Listing so you can watch execution line by line.
Writing and running a sequence
There are two natural ways to start a sequence, and they meet in the middle because every view edits the same program.
Record it. With the header on Calculator, work the keypad as you would any scientific calculator. Alongside the standard keys is a strip of program keys - PROMPT (ask the user for a value), DISPLAY, PRINT, STO (store into a variable), RCL (recall one), and LBL (a label) - that let a recording do more than plain arithmetic. As you press keys, the sequence panel writes down each step in colour-coded form. When you reuse a typed number, the Recorder may offer to lift it into a named parameter, so the finished sequence can be run with different inputs. This is the Recorder in full; see the Recorder.
Build or write it. Switch to Blocks to assemble the program from the palette on the right - its categories are CONTROL, MATH, VARIABLES, I-O, and LOGIC - clicking a chip to drop that block into the workspace, where blocks nest to show their structure. Or switch to Listing and type the sequence as text; each executable line shows its computed value in a preview column beside it, refreshed as you edit, with a console below for output. See Blocks and the Listing.
Run it. Press Run in the header (Listing or Blocks) or use the inline test-run on the Calculator view. If the sequence prompts for input it will ask; results appear in the console. To step through it and inspect what happens on each line, choose Debug on the rail - see the debugger.
A tiny worked example. Suppose you want a sequence that turns a temperature in Celsius into Fahrenheit.
- On the Listing view, give the sequence a name and one parameter - say a value
cfor the Celsius reading. - On the next line, write the conversion:
c × 9 / 5 + 32. The preview column beside the line shows the result for the current value ofcas you type. - Press Run. The sequence asks for
c, you enter100, and it reports212.
Switch to Blocks and the same three ingredients - the parameter, the arithmetic, the result - are shown as nested colour-coded blocks; switch to Calculator and you could have recorded the same steps by pressing keys. It is one sequence throughout.
Sequences are saved as files. The main sequence extension is .cat; portable libraries use .cats, self-running sequences use .catx, and there is a .nex form as well. The differences are set out in file types.
Programming+ and the AI assistant
Programming+ is Programming mode with one addition: a collapsible AI assistant panel docked to the right of the workspace. Everything above still applies - the same rail, the same three views, the same debugger - the panel simply sits alongside them.
The assistant lets you describe a calculation in plain language and have a sequence drafted for you. Type a request into the input bar at the foot of the panel; the reply appears as a chat thread, and when the assistant produces a sequence it shows it as a generation card - a read-only preview of the blocks it wrote, with an Explain button and an Insert & run button so you can review before you commit it to your own sequence. A header chevron collapses the panel to a thin strip when you want the room back, and expands it again when you need it.
Two things are worth knowing. First, the assistant uses your own language-model provider - the one you configure under Settings, in the connectors section - because no AI provider is built into Castiel. Until you have configured one, the panel says so and the input stays disabled. Second, while the assistant is generating, its send button becomes a Stop control so you can cut a response short. The full behaviour is covered in the AI assistant.
Related chapters
- The Recorder - building a sequence by keying it on the calculator.
- The Listing - the text editor, per-line previews, and console.
- Blocks - the visual block editor and its palette.
- The debugger - breakpoints, stepping, variable watch, and the call stack.
- The Library - saving, opening, and sharing sequences.
- The AI assistant - the Programming+ panel and configuring a provider.
- The Catena language - the language your sequences are written in.
- File types -
.cat,.cats,.catx, and.nex.